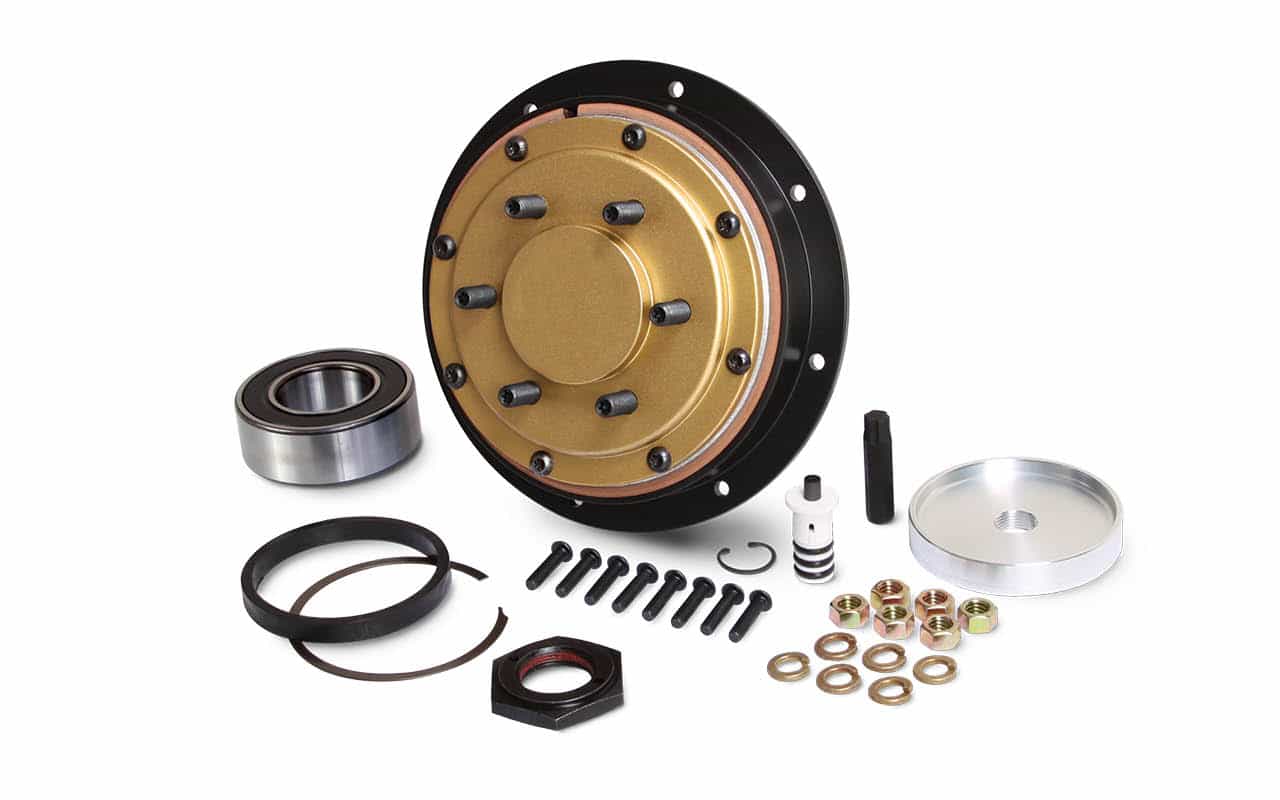
14-256-1 Kit Masters Gold Top Kit for 2.56” Pilot-1 Pulley Bearing
1 in stock (can be backordered)
14-256-1 Kit Masters Gold Top Kit for 2.56” Pilot-1 Pulley Bearing.
UNIT DROP SHIPS FROM KIT MASTERS.
Slight shipping delay may occur. Please call us.

$530.67 Each
1 in stock (can be backordered)
14-256-1 Kit Masters Gold Top Kit for 2.56” Pilot-1 Pulley Bearing
14-256-1 Kit Masters Gold Top Kit for 2.56” Pilot-1 Pulley Bearing
Upgrade while replacing your worn Horton Drivemaster fan clutch! Kit Masters patented Gold Top Rebuild Kits reduce nine components into one component assembly, saving significant installation time and reducing the risk of installation errors.
The Gold Top kit is engineered to outlast and outperform the competition. Four point urethane seal. Urethane is the best seal in a Dynamic application. Gold Top’s cap design eliminates the need for a cap seal, eliminating a major leak path. Cast iron pulley mates with cast plate vs. cast to aluminum, reducing corrosion and wear. Significantly improved friction material. Gold Top’s one component assembly eliminates the risk of under lubricating seals and reduces the risk of improper installation.
The Gold Top eliminates the need to individually handle the following items:
- Friction Plate
- Friction Material
- Piston
- Piston O-ring
- Retaining Ring
- Spring Housing
- Viton Seal
- Face Seal
- Lubricants
- Even the Torx bits are included.
How To Install a GoldTop Fan Clutch Kit
GoldTop Auto Lock - Preventing Fan Clutch Failures
GoldTop Fan Clutch Torque Test
| Weight | 25 lbs |
|---|
ITEM Usually in stock.
O.E. Equivalent Fits some “Drive Master” applications
Warranty 200,000 Miles / 24 Months
Replaces Manufacturer Part #(s)
994353, 994902, 995031
Brand
Based on 2 reviews
Add a review Cancel reply
FAQs
–What is the difference between a 14-256 and a 14-256-1?
The difference between GoldTop part numbers 14-256 and 14-256-1 is the bearings. Part number 14-256 contains two 6209 bearings, while part number 14-256-1 contains one 3209 bearing. These bearings are not interchangeable.
–How much air pressure is required for a GoldTop to operate properly?
In order for a GoldTop fan clutch to operate properly, there must be between 90 – 120 psi of air pressure going into the fan clutch. This means the air pressure must be tested at the end of the air line, where it connects to the fan clutch. The compressor’s pressure gauge does not accurately show how much air pressure is actually entering the fan clutch.
NOTE: Bearing spacers always come in pairs – one for the inner race and one for the outer race. You should never install only one spacer.
–Do I need to put spacers between my pulley bearings?
There are several different pulley bearing configurations that you will find when rebuilding Horton® DriveMaster® fan clutches. Regardless of the number of bearings or the configuration of them, you will ALWAYS save and re-use any bearing spacers that come out of your original fan clutch. When installing bearing spacers, always place them between the bearings.
–How do I remove the “jack bolt” on the front of a DriveMaster® if it is stuck?
Quite often, the T-55 torx bolt, also known as the “jack bolt”, on the front of a DriveMaster® fan clutch will become stuck and you will not be able to loosen it. To solve this problem, first try applying heat to the bolt. If that does not work, use a 2 1/4” hole saw to cut the fan plate around the jack bolt. This will allow you to remove the fan plate and then access the friction screws. To see a demonstration, click here.
–Why won’t my GoldTop fit into the pulley?
If your GoldTop fan clutch assembly bottoms out, or doesn’t fit into the pulley, there are a couple of things to check:
1. Did you re-install the air chamber cap? If you re-install the air chamber cap (the coaster-shaped disc that was in front of the air cartridge) that you took out during disassembly, your GoldTop will not fit properly. The air chamber cap should be discarded during disassembly.
2. Are you installing the GoldTop on an International truck? Some Internationals have a modular fan clutch system that requires it to be installed on the truck one piece at a time. If you have one of these fan clutches, you will need an adapter, part number 24-4700.
–How do I know which pulley bearing configuration to use when installing a GoldTop fan clutch?
There are several different bearing configurations that you will find when rebuilding Horton® DriveMaster® fan clutches. To ensure that you install the proper replacement bearings and spacers, refer to this chart.
–My fan clutch is slightly damaged. Can I still rebuild it?
Before deciding if you will be able to rebuild your fan clutch, you will need to assess it. There are several points to inspect:
« Make sure the pulley is not chipped or damaged. If it is damaged enough to cause damage to the belt, the fan clutch will not be rebuildable.
« Make sure the bracket is not broken or cracked. If it is, the fan clutch will not be rebuildable.
« Check to see if the shaft is worn. A shaft that has been damaged or worn from the pulley bearings will result in repeat bearing failure.
« Check the inside of the pulley. Inspect to see if it is worn or damaged from the pulley bearings.
If the bracket, shaft and pulley are all in acceptable condition, you will be able to rebuild your fan clutch.
–Why won’t my GoldTop disengage?
First, check your air pressure right at the entry point of your fan clutch. You need a minimum of 90 psi, right at the entry point of your fan clutch, in order for it to operate correctly.
If you have more than 90 psi, right at the entry point of your fan clutch, and your fan clutch still won’t disengage, the Auto Lock feature on your fan clutch has kicked in.
–I have adequate air pressure, but my fan clutch still won’t disengage. Why?
If you have more than 90 psi, right at the entry point of your fan clutch, and your fan clutch still won’t disengage, the Auto Lock feature on your fan clutch has kicked in. When your friction material nears the end of its life, the Auto Lock feature fully engages your fan clutch to help you get to a service shop to get your fan clutch maintained, instead of leaving you stranded on the side of the road. Your fan clutch needs to be rebuilt or replaced.
–I just installed a GoldTop and my bearings failed within a couple days. What happened?
When you installed your pulley bearings, you most likely did not install your inner race bearing spacer, which should always be installed along with the outside race bearing spacer. If you do not install the inner race bearing spacer, when the 2” bearing nut is torqued down on the shaft, it pre-loads the inner race of the bearings causing them to prematurely fail.
–My fan clutch won’t disengage and is leaking air through the back of the bracket. What happened?
The air cartridge is not mating correctly against the bottom of the GoldTop. Inspect the carbon on the air cartridge. Replace your air cartridge if needed.
–Why won’t my GoldTop engage?
When your fan clutch won’t engage, this usually means that your GoldTop is out of friction. To test this, shut off your truck and try to spin your fan blade. If you can spin your fan blade, then you have no friction left and your fan clutch assembly needs to be rebuilt or replaced. If your fan blade does not spin, your fan clutch is properly engaged. GoldTop fan clutches engage when there is no air reaching the fan clutch.
–If I have a Horton® HT/S style fan clutch right now, can I use a GoldTop kit to rebuild it?
No, GoldTop kits only rebuild Horton® DriveMaster® style fan clutch assemblies. There may, however, be a newer style remanufactured fan clutch available that can replace your HT/S style fan clutch. Contact Kit Masters customer service to see if this is an option. You would also need to change out your solenoid valve with this conversion because the Horton® HT/S style fan clutches are –air-to-engage” and GoldTop fan clutches are –air-to-disengage.”


asaffar (verified owner) –
delivered on time as published and as ordered
asaffar –
Jason gibbs (verified owner) –
I received my fan clutch kit earlier than expected. It was well packed and arrived with no damage. Kit masters has made it very easy to rebuild your air fan clutch with this one assembly instead of many parts that originally make up the clutch. Complete rebuild took about three hours that is including removal and installation. The clutches seem to be strong and engage and disengage properly at around 190°.
Jason gibbs –